Categories
Android

Delphi XE6 is on Fire

Remember the demonstration I did showing how Delphi works great with Ouya? Well, there is a new set top box in town, the Amazon Fire TV. Just like the Ouya, it is a Android powered set top box. So, does it support everyone’s favorite Android development tool? Turns out it works great with Delphi XE6. It uses a wireless ADB connection, so you just need to follow their simple steps to Connect ADB and it shows up in the IDE as the Android device AFTB (not sure what that stands for). After that you can develop and deploy to it just like any other Android device.

When you run your app from the IDE it will popup and run on the Fire TV, but after you exit your app you won’t see it anymore. It appears Fire TV only displays apps that are loaded from their app store on the home screen. Not to worry, you can easily launch it from the Settings -> Applications screen. Simply select your app and choose Launch application.

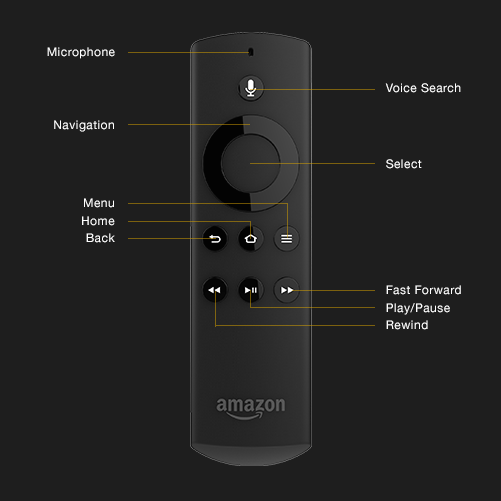
By default your only input device is the Amazon Fire TV remote.

firetvremote

Simply handle the OnKeyUp event on your form and you will receive events with the key codes vkLeft, vkRight, vkUp, vkDown, vkMenu, vkHardwareBack, vkMediaPlayPause and a key value of 0 for the select, fast forward or rewind buttons. The Home and Voice Search buttons are always handled by the OS. If you choose to handle the vkHardwareBack then set the key value to 0 (or any other value) and the system will ignore it, otherwise your app will exit.

Fire TV also supports a gamepad as well as various other bluetooth input devices, like a bluetooth keyboard, which greatly expands the input options. You also could use App Tethering to tether a mobile or desktop/laptop app to your Fire TV app to provide input and display it on the big screen. Like an image receiver that receives pictures from your mobile device to display them to everyone in the room.

If you download the Fire TV SDK it exposes Game Controller and Notification classes. If there is interest I can post some Object Pascal wrappers for those later on.


Categories
Android gadgets Mobile

BlueTooth Remote Control Car

How to use BlueTooth is one of the most common requests with Delphi. During our Devices and Gadgets webinar David I. showed how to browse paired BlueTooth devices and connect to them.

But wait, there’s more! Daniele Teti & Daniele Spinetti of bit Time Software created an Android client app to control a BeeWi – BBZ201 – Mini Cooper S Bluetooth Car. It may work with other BeeWi Bluetooth remote control vehicles, but has not been tested with any (that I know of).

The Multitouch code is Copyright (c) 2006-2014 Iztok Kacin, Cromis and used under the BSD license.

It currently doesn’t have BlueTooth discovery, so once you pair your device you need to update the source code with the MAC address of your car.

I’ve created a GitHub repository for the project. It should work with XE5 or AppMethod just fine. I’ve got a version updated to XE6 that exposes the controls via App Tethering too, which I will upload later.

Categories
Android Graphics iOS Mobile Source Code

OpenGL ES Support on Mobile with XE6

OpenGL ES logoAppmethod, RAD Studio, Delphi and C++Builder XE6 all make it really easy to work with OpenGL ES on mobile devices. Under the covers FireMonkey is implemented with OpenGL ES on mobile (iOS & Android), OpenGL on OS X and DirectX on Windows. It provides a number of useful abstractions for working with 2D and 3D graphics, but sometimes you just want to get down to a lower level.

Here is all you need to access an OpenGL ES rendering context in your FireMonkey mobile application. This example is in Object Pascal, but should be easy enough to adapt to C++.

  1. Create a new FireMonkey Mobile application
  2. Select 3D application
  3. Add FMX.Types3D to the Interface uses clause
  4. In the Object Inspector, create a new event handler for the OnRender event for your form
  5. You now have access to the OpenGL render context.

You can work with the TContext3D that is passed in via a parameter, and your code will work across platforms automatically. If you want to work with the OpenGL ES APIs directly you can do that too with the following uses clause in your Implementation section:

uses
  // Gives you access to the FMX wrappers for GLES
  FMX.Context.GLES, 
{$IFDEF ANDROID}
  // Direct access to the Android GLES implementation
  Androidapi.Gles, FMX.Context.GLES.Android;
  // More useful units for Android
  //, FMX.Platform.Android, Androidapi.Gles2, Androidapi.JNI.OpenGL,
  // Androidapi.Glesext, Androidapi.Gles2ext;
{$ENDIF}
{$IFDEF IOS}
  // Direct access to the iOS GLES implementation
  iOSapi.OpenGLES, FMX.Context.GLES.iOS;
  // More useful units for iOS
  //, iOSapi.GLKIT, FMX.Platform.iOS;
{$ENDIF}

And here is an example event handler with a couple calls to the OpenGL ES APIs:

procedure TForm1.Form3DRender(Sender: TObject; Context: TContext3D);
begin
  glClearColor(1, 1, 0, 1);
  glClear(GL_COLOR_BUFFER_BIT);
end;

This accesses the iOS and Android equivalents of the same OpenGL ES APIs. Thanks to the compiler directives, and the cross platform nature of OpenGL ES, this code just works. I’m not an OpenGL expert, but I looked through the OpenGL ES API and all the routines I tested worked, but I never did anything interesting with them.

Categories
Android Graphics

C++Builder XE6 for Android Wallpaper

Remember the great Delphi for Android wallpaper? Well Dave has a new wallpaper to celebrate the new C++Builder for Android support.

C++Builder for Android

Thanks Dave for the great new wallpaper!

Categories
Android

Setting Android Settings

On the Android platform all the system wide settings that are accessible via the Settings app are also accessible to your app. You just need to add the uses permission WRITE_SETTINGS. Here is a simple Delphi XE5 example for changing the screen timeout.

First you need the following in your uses clause:

Androidapi.JNI.Provider, // JSettings_SystemClass
FMX.Helpers.Android; // SharedActivityContext

Here is the code to read and set the Screen Off Timeout:

function GetScreenOffTimeout: Integer;
begin
  Result := TJSettings_System.JavaClass.getInt(
    SharedActivityContext.getContentResolver,
    TJSettings_System.JavaClass.SCREEN_OFF_TIMEOUT,
    15000);  // 15 seconds is default is not found
end;

function SetScreenOffTimeout(ATimeOut: Integer): Boolean;
begin
  Result := TJSettings_System.JavaClass.putInt(
    SharedActivityContext.getContentResolver,
    TJSettings_System.JavaClass.SCREEN_OFF_TIMEOUT,
    ATimeOut);
end;

In the GetScreenOffTimeout we pass a default value to use if none is found. I passed in 15000, which is 15 seconds, or the smallest value for my phone. The largest value on my phone is 600000, which is 10 minutes. It appears you can set it to any value, even one that the settings app doesn’t explicitly list as an option.

There are lots of other settings available for your adjustment.

Categories
Android iOS webinar

Revisiting Google Glass

Few weeks ago I posted about how to launch a Google Glass app with a voice command. The app I built used buffered sensor data from the accelerometer and smooth animation to show a level. The video below is from our Making the Connection: Programming Devices and Gadgets with RAD Studio where I put all the pieces together.

Google Glass is an exciting new platform and form factor. Éric Bonilha from Digifort joined us to show interfacing IP Controllers and streaming video from IP Cameras.

Something we didn’t get to show is Éric built a prototype app for streaming video to Google Glass. His plan is to build a version of his camera surveillance app for Google Glass that will stream surveillance video to security guards on patrol. Additionally it will stream the video from Google Glass back to the security system.

It was so cool how fast Éric used Delphi XE5 to prototype accessing the camera on Google Glass and streaming video from his system to it.

The source code for my Google Glass app, and Éric’s code for accessing IP Camera & IO Controllers is available along with the replay from our RAD-In-Action Webinar. I’m looking to pick up a PTZ IP Camera and streaming it to my Google Glass next.

Categories
Android Components iOS Tools

Scanning Barcodes with RAD Studio XE5

Turns out there are a few ways to scan a barcode with RAD Studio XE5, and no sooner do I make a video about it then TMS releases a component to scan barcodes, and then Thomas Krampe sends me his component that combines them all together.

Not that we need another barcode scanning app on our smartphones, but it can be a useful feature for an app that performs another purpose to be able to scan a barcode too.

This video was part of our Making the Connection: Programming Devices and Gadgets with RAD Studio webinar. Check out the on demand replay to get the source code.

Categories
Android Brain Computer Interface devices gadgets iOS Mobile

Connecting to the Parrot AR.Drone 2.0 from Delphi XE5

My first thought when I see cool technology is to figure out how to connect to it with Delphi. So the day I got the Parrot AR.Drone 2.0 quadricopter I started working on Delphi interface. By the time evening rolled around the batteries were dead (after a couple recharges), but I had a basic interface working. The official developer guide seemed to be a little out of date, or I was reading it wrong, but once I got my facts staight, connecting was really easy. http://www.youtube.com/watch?v=aaGe2aERwgI The Parrot AR.Drone has it’s own access point. Once you’ve connected to it, then it is simply a matter of sending UDP packets for the basic controls. To accomplish that I simply used the Indy UDP Client: TIdUDPClient. Each command is sent with an increasing sequence number, so I initialize my interface as follows:

  udp := TIdUDPClient.Create(nil);
  udp.Host := '192.168.1.1';
  udp.Port := 5556;
  seq := 1;

The AR.Drone is always at 192.168.1.1 since it is the access point, and the port for communication is 5556 (one of a few ports, but the one we need for now.) It is worth pointing out that if you’ve previously flown your AR.Drone with the FreeFlight mobile app then you may need to reset your drone to unpair it. Otherwise it is paired to only that device. The commands are formatted with an AT* prefix, and a series of arguments. For example, to take off, the command is AT*REF=1,290718208 where AT*REF is the command, 1 is the sequence number (always the first argument) and 290718208 is a bitmask that means take off. I created a SendCommand routine that looks like:

procedure TARDrone.SendCommand(cmd, arg: string);
var
  full: string;
begin
  if not udp.Active then Connect;

  full := Format('%s=%d,%s' + Chr(13), [Cmd, Seq, arg]);
  Seq := Seq + 1;
  udp.Send(full);
end;

Notice the command is terminated with a carriage return (#13). The documentation says line-feed (#10), it is wrong. Supposedly you can send multiple commands in the same message, if they are separated by the carriage return. I haven’t tested that. Then I can send the some common commands like this:

  SendCommand('AT*REF','290718208'); // Takeoff
  SendCommand('AT*REF','290717696'); // Land
  SendCommand('AT*CONFIG', '"control:altitude_max","10000"'); // unlimited altitude
  SendCommand('AT*CONFIG', '"control:altitude_max","5000"'); // restrituded altitude - unsure what units 500-5000.
  SendCommand('AT*PCMD','1,0,0,0,0'); // Hover (stop movement)

PCMD is the move command. It takes 5 arguments (after the sequence number.) The first is the controller type, which we are leaving 1 for now. The next 4 are phi, theta, gaz, yaw and they are floating point numbers in an integer representation. This is where it gets interesting. The documentation says:

The number –0.8 is stored in memory as a 32-bit word whose value is BF4CCCCD(base 16), according to the IEEE-754 format. This 32-bit word can be considered as holding the 32-bit integer value –1085485875(base 10).

The first way I thought of to access the same memory as two different types is a variant record. So I came up with the following helper routine:

function IEEEFloat(const aFloat: Single): Integer;
type
  TIEEEFloat = record
    case Boolean of
      True: (Float: Single);
      False: (Int: Integer);
  end;
var
  Convert: TIEEEFloat;
begin
  Convert.Float := aFloat;
  Result := Convert.Int;
end;

Using that I built a move routine that takes 4 singles (32-bit floats) and sends them as integers:

procedure TARDrone.Move(const phi, theta, gaz, yaw: Single);
begin
  SendCommand('AT*PCMD',Format('1,%d,%d,%d,%d',
    [IEEEFloat(phi), IEEEFloat(theta), IEEEFloat(gaz), IEEEFloat(yaw)]));
end;

Now if I want the drone to go up I can call:

  Move(0,0,5.6,0); // positive gaz is upward acceleration

Now it is just a matter of figuring out how to the rest of the movements map to the physical worked and building a user interface on Android, iOS, Windows or Mac. Maybe all 4! Once I build up the API a little bit more I’ll share some full working apps and libraries. Let me know if you are interested in collaborating on such.
Categories
Android MVP Source Code

Every Android API for Delphi

Delphi XE5’s support for Android includes many of the most common Android APIs either wrapped in nice cross platform libraries and component or accessible directly via the JNI wrappers. The rest can be accessed by creating headers to expose them. The new JNI Bridge makes this calling of the managed Java APIs from the native Delphi app much easier then it used to be, but it still takes a little effort to make the translation (it is easier than translating a Windows API). Brian Long (an Embarcadero MVP) has an excellent video from CodeRage 8 that goes into great detail on the process.

But all of that has now changed. CHUA Chee Wee aka “Chewy” (also an Embarcadero MVP) has released an Android2DelphiImport tool that makes wrapping and accessing any and every Android API much easier. It gives you 3 distinct benefits:

  1. You can point it at Android.jar in the Android SDK and have it create wrappers for EVERY Android API. You’ll need to copy and paste out the pieces you want (it puts them all in one source file), but it saves a lot of typing and research. It implements the wrapper using the JNI Bridge just like the RTL does.
  2. You can point it at any other built in Java library, like the Google Glass GDK that provides all the Glass specific features on Google Glass, or maybe the Google Cloud Messaging (GCM) API. You’ll have a source file that wraps all the API calls exposed in that JAR file.
  3. You can use it to wrap a 3rd party Java JAR file for Android and it will create a .PAS interface for it, bundle it up for inclusion in your Delphi app, and load it at runtime.

As a matter of testing this tool I pointed it the Android.jar file for Kit Kat. It took a little while, but when it was done I had over 100,000 lines of interface wrappers covering EVERY Android API on Kit Kit. I copied out the lines for Toast support, added in the necessary uses statements, and I had full toast support in just a few minutes.

My next test was to point it to the Google Glass GDK (Glass Development Kit) for building native Glass Apps. Previously I had only used the Android SDK & NDK, which supports the common Android functionality on Glass, but the GDK adds support for Glass specific features. Once the GDK is installed (via the Android SDK Manager under API 15) you will find gdk.jar in the sdk\add-ons\addon-google_gdk-google-15\libs folder. It created a nice wrapper for it, but that wrapper wouldn’t compile because the uses clause was incomplete (it has a notice that you need to adjust the uses clause). I had to track down 4 additional units for the uses clause and then I extracted 3 more apis from the earlier Android wrapper to cover APIs that weren’t previously exposed. In all it took me about 15 minutes and then I had full support for the Google Glass GDK.

Since compiling isn’t enough, I built a simple app to insert and remove cards on the Google Glass timeline. It worked like a charm. I didn’t need to tweak or adjust the generated code at all (beyond the uses clause). Here is my code:

tm := TJTimelineManager.JavaClass.from(SharedActivityContext);
card := TJCard.JavaClass.Init(SharedActivityContext);
card.setText(StringToJString('Hello Glass'));
card.setFootnote(StringToJString('From Delphi'));
id := tm.insert(card); // Use id to edit or remove card later

I haven’t tested the 3rd scenario yet, but I did observe how it works. The tool creates a .apk out of the selected JAR file. It then includes a routine to load that APK at runtime so you can call into the methods it includes. You would need to go this route when the JAR isn’t built into the platform already. I have a library that I’m planning to test this with (so stay tuned), but I wanted to blog about the other benefits right way.

I am really excited about the potential of this tool. Not only does this mean you have even easier access to the entire Android API, but you also have easy access to all the extended APIs and 3rd party APIs. It has a simple command-line interface, and very few options, but when it works that is all you need.

Right now purchasing it is a little more complicated than using it. He only accepts Bitcoins, 1/4 Bitcoin to be exact. Based on the current exchange rate it is about $200 US, which is an excellent value for what you get (and considering how much effort has gone into its development). So you will either need to mine or purchase a bitcoin to pick this tool up, but if you are doing Android development I highly recommend it.

Categories
Android Delphi Projects iOS Mobile

Learning from Digifort

You’ve probably seen Éric Fleming Bonilha videos showing off his Digifort mobile applications developed with Delphi XE5. The videos don’t mention it, but the back end server and client applications are all written in Delphi too. Just in case you haven’t see the videos, here they are again:

Earlier version, but on a lot of different devices:

Embarcadero just completed a case study with him too, which is really informative. I spoke with him down in Brazil and he said they previously developed mobile clients with both Java and Objective-C, and found Delphi let them develop their projects much faster, and they get both Android and iOS from one project. Also, and perhaps more importantly he said the performance of the Delphi client was just as good, plus they found it more flexible for building a user interface that looks great and is easy to use.

Digifort Mobile Client

Digifort may be based in Brazil, but their clients are all over the world and are a mix of government agencies and business of various sizes. Eric arranged a trip to meet me in Scotts Valley this last week. He showed me some pictures of some of the walls of monitors his clients have, all powered by Digifort. Some really impressive installations.

A big part of his trip was to pick up a his very own Google Glass to start developing a Digifort mobile app for Google Glass. In just a couple short sessions he was capturing images from the built in camera, connecting to his remote server, and streaming live video from Brazil to the glass display. The use case for security personal to view cameras while on patrol, while sharing what they see with everyone else is a great one.

David, Eric and Jim

Eric also had a chance to visit with some people from R&D and product management and share his experiences working with Delphi XE5 and FireMonkey. Here are some best practices he found for making a really smooth user interface.

  • FireMonkey handles PNG images really well. He makes a lot of use of transparent and semitransparent PNG images in TImage components. Layering, animating and zooming those images is what he uses to create some of those really great effects, like the joystick control for camera control.
  • The TFloatAnimation and other animation effects are really powerful. He uses those extensively for smooth animations.
  • He created the drawer interface using TFrames (he uses a lot of frames). The main (center screen) has a Pan Interactive Gesture on it. He looks at the gesture to see if it is horizontal (comparing the gesture start to a later gestsure event) and has traveled at least 10 pixels in that direction. Once that happens then he moves the edge of it with the current finger position from the gesture. He also tracks the speed of the movement, so if you let go then he uses another TFloatAnimation to smoothly finish the movement at the same speed.
  • When the drawer starts to open he pauses all the video and other animations. This really increases the performance of the drawer animation.
  • Anything that is not currently shown on the screen has its visibility set to false. So if the drawer is closed, then everything in the drawer is invisible (since it is in a frame he just sets the frame to invisible). This keeps it from rendering and gives what is visible all the processing power. This is a common suggested optimization with many mobile development tools.
  • It is important to think about a mobile app’s interface as a mobile app. Don’t try to squeeze a desktop app onto a mobile device. That will only frustrate you and your users.
  • In his lists of cameras he uses a TVertScrollBox and fills it with a custom component that contains TImages and TLabels. That gives him maximum flexibility for the drag to reorder (again a Pan Interactive Gesture). He did find that the TLabel has better performance than drawing the text manually inside his custom control.

There were a lot of things he shared where he spent a little extra time to get things just right, and that is what makes the difference for a really smooth user interface. When asked about the learning curve to move from Desktop VCL to FireMonkey Mobile he said there was just a little learning curve, but now he really likes FireMonkey better than VCL. There was talk about having him collaborate for a user interface webinar, which I’m sure will be very informative.

You can catch Eric’s appearance in our Devices and Gadgets webinar on the webinar replay (posting any day now). And download his sample code (along with the rest of the code from the webinar).

What are some tips and best practices you’ve found in your FireMonkey mobile development?