On the Android platform all the system wide settings that are accessible via the Settings app are also accessible to your app. You just need to add the uses permission WRITE_SETTINGS. Here is a simple Delphi XE5 example for changing the screen timeout.
function GetScreenOffTimeout: Integer;
begin
  Result := TJSettings_System.JavaClass.getInt(
    SharedActivityContext.getContentResolver,
    TJSettings_System.JavaClass.SCREEN_OFF_TIMEOUT,
    15000);  // 15 seconds is default is not found
end;

function SetScreenOffTimeout(ATimeOut: Integer): Boolean;
begin
  Result := TJSettings_System.JavaClass.putInt(
    SharedActivityContext.getContentResolver,
    TJSettings_System.JavaClass.SCREEN_OFF_TIMEOUT,
    ATimeOut);
end;
In the GetScreenOffTimeout we pass a default value to use if none is found. I passed in 15000, which is 15 seconds, or the smallest value for my phone. The largest value on my phone is 600000, which is 10 minutes. It appears you can set it to any value, even one that the settings app doesn’t explicitly list as an option.
Some people asked for the source code to using the new XE5 REST Client Library to consume the Kimono web service. The crazy thing is there isn’t any. I decided to make a video about how easy it is to consume REST web services the the new REST Client Library and the REST Debugger. In the process I thought of a way to make it even easier by supercharging the Rest Debugger (source code below).
In this video I show you how to create a REST Web service with Kimono Labs (in beta, so it will change) and then bind that data to your XE5 app using the REST Debugger.
You can supercharge your REST Debugger too. The source code is installed with XE5
You will want to copy it somewhere else before modifying it. Then add a button where ever you want, and on the click event for the button add the following code:
And then download uCopyComponents.pas and add it to your project and uses clause. It is pretty simple, but is designed specifically to work with non-visual components, although could be modified to work with visual components too.
If you want to include the TClientDataSet in the copy, then add it to the array (although make sure it is not active). Or you could modify it to add a TFDMemTable. Use it how you wish, I hope it works for you. If you discover any bugs make any changes let me know. If anyone is interested in contributing to it, let me know.
I love the new TRESTClient components in XE5. Especially the ability to visual bind a REST datasource with the use of the TRESTResponseDataSetAdapter. Now I find I’m always on the look out for new REST datasources. The REST Debugger makes the whole process really easy too.
The other day I hit the mother-load of REST datasources with Kimono Labs. It is a creative web service that makes it easy to scrape a web site and turn it into a REST data source. It looks for repeating data on the page. Their free service is enough to get you started. I created a simple REST datasource of San Francisco 49ers games from their schedule on their web site.
A few tips for working with the Kimonolabs REST API.
Make sure the web data doesn’t include hyperlinks – if it does, then the REST data will include objects containing the href and the text, which doesn’t map to a grid well.
Use results.collection1 as your root element in the TRESTResponseDataSetAdapter and you are off to the races.
It doesn’t work with every web page because of malformed pages, but it works with a lot of them.
There is no way to edit your API once you’ve finished it (yet), so you end up deleting and recreating it a few times.
They have a lot of videos and tutorials on their site walking you through how to use their service. Take a look and I’m looking forward to your REST enabled apps!
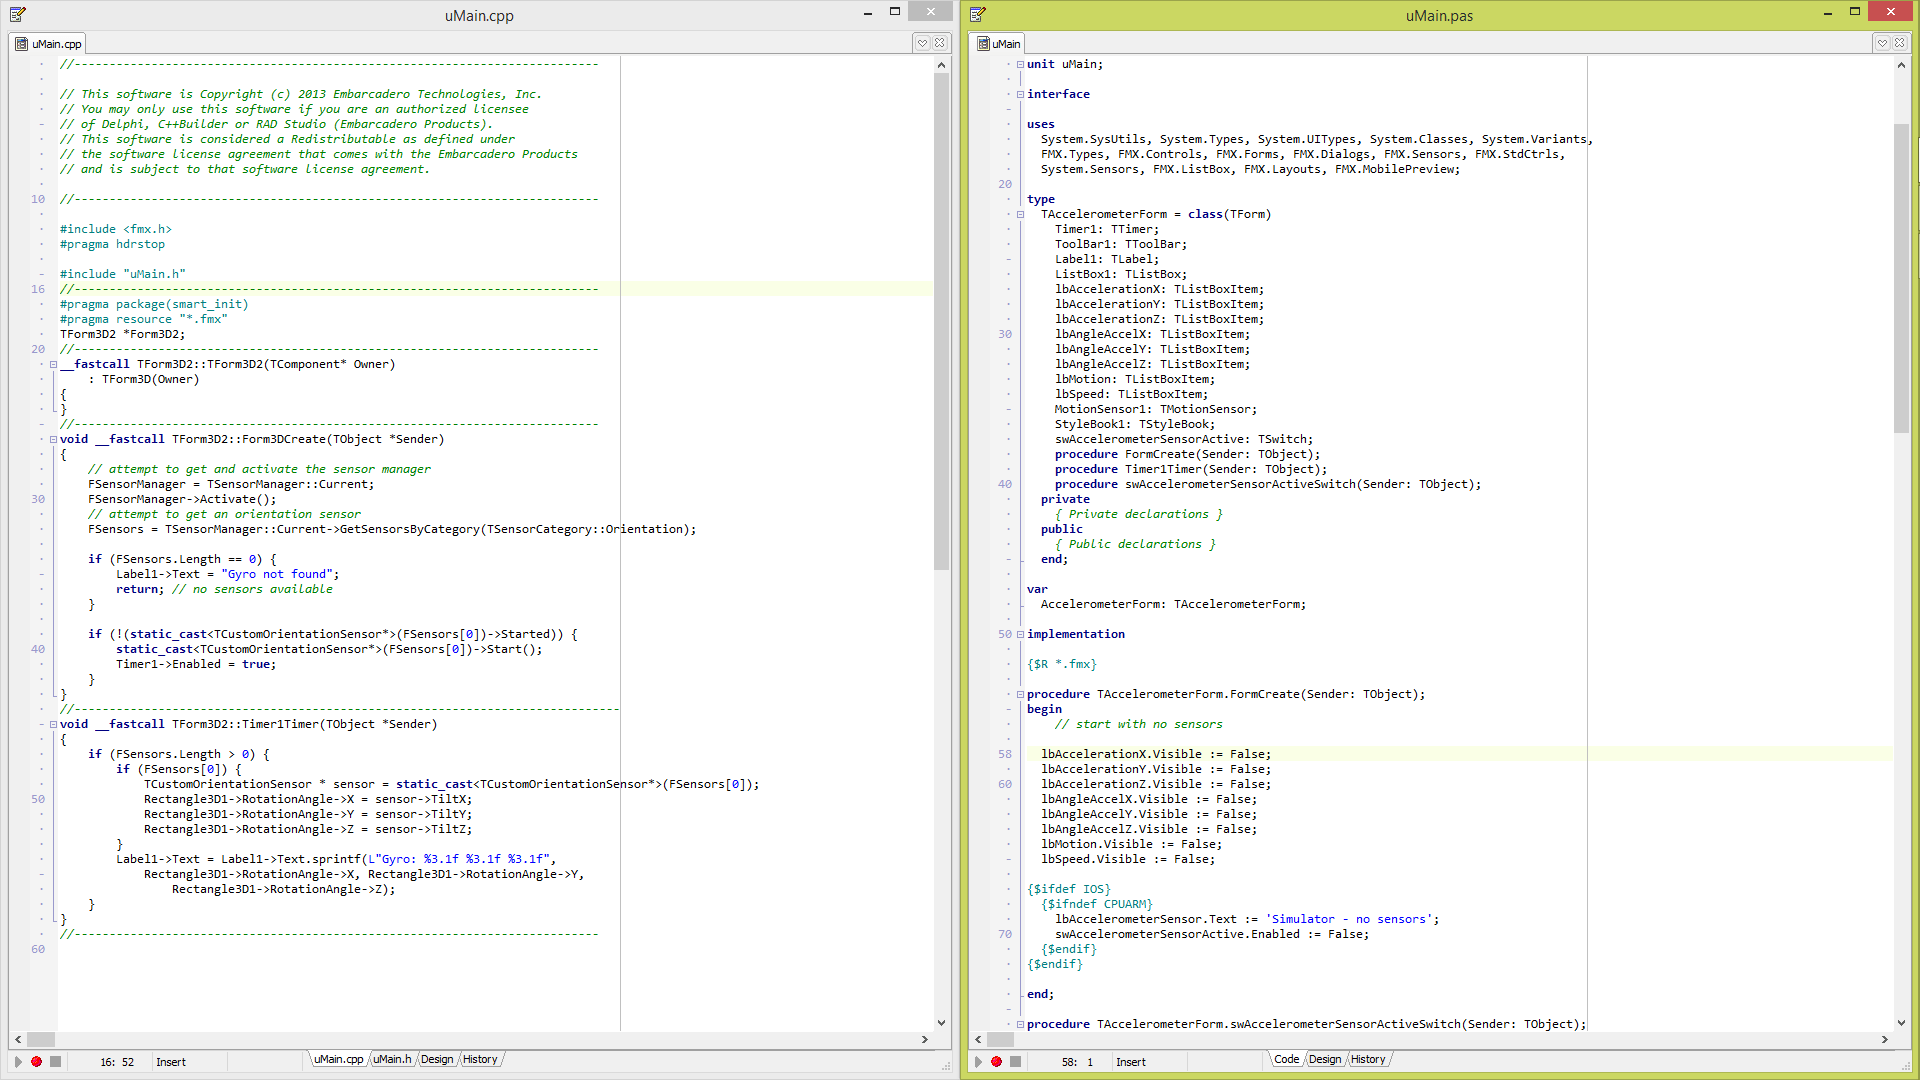
Sometimes we forget some of the basics. Had a customer ask if you can maximize the code editor Window in RAD Studio and edit two files side-by-side. I’d heard someone talk about this a while ago, but I couldn’t remember the details.
There is an option in Tools / Options / Editor Options / Display that allows a code window to Zoom to full screen.
Then right click in the code window you want full screen, bringing up the View Menu, and choose New Window
With Windows 7 or Windows 8, just drag this new code window to the left or right edge of the screen and it automatically gets tiled nicely.
Building a running an app on Google Glass is easy with Delphi XE5, but what about integrating it into the Glass menu system and launching it with a voice command? Turns out that is pretty easy too.
First of all, I find it easiest to to add AndroidManifest.template.xml to your project. It shows up in your project folder after you build an Android app the first time. This template is for the AndroidManifest XML file that is used to describe your application to the Android OS. We open this file and find the element. We then need to add the following child to it, along with the and children elements already there.
This tells it that our main activity is eligible to receive the VOICE_TRIGGER intent. Next we need to specify which voice command we want to receive. This is done by adding a <meta-data> element outside of the <intent-filter> element (but still inside the <activity> element).
This specifies that there is VoiceTrigger metadata in the xml file voice_trigger_start.
Update: Thanks to the Glass XE16 KitKat update, a special permission is required to use a non standard voice trigger command. In the Manifest, right below the <%uses-permission%> line you need to add the following special
permission:
So now we need to create that XML file. Simply right click on your project in the Project Manager and select Add New, then under Web Documents select XML File. Rename it to voice_trigger_start.xml, save it, and edit it to look like the following:
<!--?xml version="1.0" encoding="UTF-8"?-->
 <trigger keyword="My voice is my passport, verify me.">
The value of keyword can be any word or phrase that you want to associate with your app. This will be used in the sentence of “OK Glass, my voice is my passport, verify me.” Generally you want to keep it short, like “take a picture” or “get directions”, while not using something that conflicts with a built in command. This is also what will show up in the launcher on glass next to your app icon.
Now we use the Deployment Manager to specify the location for this new XML file. Simply go to Project \ Deployment and select Add File and choose the voice_trigger_start.xml file. Then change the Remote Path to res\xml.
Simply run your app from the IDE (after you’ve installed a Google Glass USB ADB driver) and after that you can launch your app from the Glass launcher or your selected voice command.
I’ve seen other attempts at universal ADB (Android Debug Bridge) drivers, but I’ve tested those and not had any luck. The following steps have worked for a wide variety of devices that I’ve tested it with. With such a huge variety of different Android devices available it isn’t always easy to find the right USB driver, but you need an ADB USB driver to connect development and debugging tools. This is different then being able to add and remove files from the Android device.
Disclaimer: I’ve done this a few times, and talked to others who have done it too, all without any incident. This is however a bit of a hack, and may result in some unintended consequence, which may including voiding your warranty, damaging your computer, damaging your android device, or even causing your hair to fall out. Proceed at your own risk.
First of all, you need the Android SDK installed. You don’t need the ADT Bundle or Android Studio if you don’t want those. Just scroll down to Use an Existing IDE. If you have RAD Studio XE5 (an edition with Mobile) installed then you had the option to install this during the RAD Studio install. I’ll include directions for either installation method. Google provides a USB driver for their Nexus line of devices. This is the driver we are going to use, but first we need to modify it to work with our device. I’m assuming you are running Windows. OS X doesn’t need device specific USB drivers.
These directions are for Windows 8.1. Run the Android SDK Manager. You can do this from the Android Tools start menu item that is installed with RAD Studio, or run the android.bat file located in the SDK\Tools folder of the Android SDK installation. This brings up the Android SDK Manager. Scroll to the bottom and look for Google USB Driver in the Extras category. If that is not installed then put a check mark next to it and install it. Next go to the folder where your Android SDK is installed. With RAD Studio XE5 the default install location is under Users\Public\Documents:
From there go to the \sdk\extras\google\usb_driver folder, as that is where the Google USB Driver is installed. I typically make a copy of these folder somewhere else, as we will be modifying some of these files. If you get an updated driver, then your changes will be overwritten if you leave them here. Next we need to go to Device Manager with your new Android device attached (and in developer mode). Look for the entry for Android under Other devices. This is your Android device without a driver loaded. If you don’t see it then either it isn’t connected, or your Android device isn’t in developer mode. It is possible it may show up with the name of the Android device, but it should still be under “Other devices” and have the yellow triangle on it. Right click on this device and select properties. Then go to the Details tab and from the dropdown select the Hardware Ids property.
These are the identification for your specific Android device. It should look similar to the picture above.
Now using your favorite text editor open the android_winusb.inf file we found in the usb_driver folder above. Locate the line that says [Google.NTamd64]. You’ll see some entries above this line, these are for 32-bit installs (it is section [Google.NTx86]), and the entries after the line are for 64-bit installs. Chances are you only need to edit one section, since you are doing this for your own windows install, but you can edit both sections if you are not sure. The lines are the same.
So add lines similar to the following in the section(s) you choose.
You probably noticed that is that crazy looking string on the right looks really similar to the values we saw for the Hardware Ids from device manager. The line prefixed by the semicolon is a comment, so I usually put the name of the device there.
Notice that the portion of the identifier with REV_#### is missing (I usually leave it off, but it should work either way). Also the %SingleAdbInterface% line doesn’t have the MI_## portion, while the %CompositeAdbInterface% line does include it. You might need to experiment with this to find what works (again remember the disclaimer).
If you want to load the driver for Google Glass, then it should look something like the following.
(the first two lines are for the 2nd edition, the second two lines are for the 1st edition I believe).
Advanced: If you want to load the driver for the bootloader, then put your device into bootloader mode and add a %SingleBootLoaderInterface% line for the value that shows up in Device manager then (it will be different).
Now save the android_winsub.inf file. Unfortunately since it is modified, the signature is invalid and Windows won’t let you load it. With Windows XP this wasn’t such a big deal, but in recent versions the driver signature is enforced. There is a way around it though.
Check out the following guides for loading unsigned drivers in specific OS:
I got a great call the other morning. A Delphi developer from a few versions back was considering upgrading to XE5, but he wanted to know if FireDAC was recommended for database access, or if he would need a 3rd party library.
I remember working on some data driven Delphi applications when the drill was you always bought a 3rd party database access library. There are lots of great database access libraries to choose from, which is one of the great things about Delphi: all the technology partners!
In XE5 the BDE is officially deprecated (and has been for a while), but it still ships (maybe not for much longer though). dbExpress is still there, and so is dbGo and IBX, and they are all good, specialized database access libraries. But with the full integration of FireDAC in XE5, it is the recommended database access library, and for good reason.
FireDAC is a universal data access library: you use the same components to connect to a huge variety of databases. The usage pattern is similar to the BDE, and it is fully bidirectional. It also has a large collection of specialized features for dealing with specific databases, and local, in memory data.
Of course you are still welcome to continue using 3rd party libraries, and some of them may offer some other specialized features. That is one of the great things about Delphi, C++Builder and RAD Studio: It comes with great features in the box, but you can expand on those with 3rd party libraries.
If you still aren’t on XE5, you still have a little time to take advantage of the special offers.
The Android Emulator is veryslow. The main reason is because it is emulating the ARM CPU & GPU, unlike the iOS Simulator, which runs x86 code instead of the ARM code that runs on the actual hardware. This means the iOS Simulator is typically faster than actual hardware, and the Android Emulator is slower than actual hardware. Most Android developers I talk to develop on actual hardware, but sometimes you need the emulator, and when you are using it you need it to run faster.
You may see some articles or tips about using the Intel HAXM, BlueStacks, Genymotion, Android-x86 or some other high performance Android emulator. These almost always are using an x86/Atom Android image, which runs faster because it doesn’t need to emulate the CPU, running x86 code on your host CPU (much like the iOS Simulator). Yes, they are faster, but the majority of Android devices (in the USA at least) are ARMv7. So you are technically testing on a niche hardware configuration that is not likely to be what your app runs on in the real world. In some parts of the world, Intel Atom based Android devices are becoming more common, so those emulators do serve a purpose.
Here are some tips to make the ARM Android emulator faster for any Android development tool, but my examples are specific to Delphi XE5. Many of these tips can be combined for better performance. Using these tips I’ve seen the emulator go from sluggishly terrible to actually usable on a few different systems.
Use Actual Hardware – OK, so this doesn’t speed up the emulator, but it is worth mentioning again. There are a number of other advantages besides speed, and Android hardware is pretty cheap compared to iOS hardware. Get a few different devices, and you are set.
Don’t Run the Emulator in a Virtual Machine – The emulator is a virtual machine, and running a virtual machine in a virtual machine just compounds the problem. If you are developing in a virtual machine, all is not lost, you can still debug against a remote emulator to run the emulator on the host machine.
Use Parallels Desktop 9 – If you must run the emulator in a virtual machine (which I don’t recommend) I hear reports that Parallels Desktop 9 for Mac OS X is faster than VMWare Fusion. You can test this for yourself with the latest version of VMWare Fusion. The comparison I heard about was between Parallels 9 and Fusion 5, which is now a version behind.
Use Host GPU – There is an option when creating an Android Emulator Instance (called an AVD or Android Virtual Machine) to use the physical GPU on the host machine instead of emulating it in software. This gives a huge performance boost. So create a new Android Emulator, and make sure to enable Use Host GPU. (Not, this is incompatible with the other performance option of Snapshot, but I’ve found Use Host GPU results in better emulator performance, while Snapshot only speeds up emulator startup.)
Copy the OpenGLES libraries – After launching an emulator with Use Host GPU enabled, sometimes you get an error “Could not load OPENGLES emulation library”. If you do, then use this tip (if you don’t get the error, then skip this tip).This has two common causes, the first is fixed with a reboot. If that doesn’t work then you need to copy the necessary DLLs to a different directory so the emulator can find them. Simply copy lib*.* from C:\Users\Public\Documents\RAD Studio\12.0\PlatformSDKs\adt-bundle-windows-x86-20130522\sdk\tools\lib up one folder to C:\Users\Public\Documents\RAD Studio\12.0\PlatformSDKs\adt-bundle-windows-x86-20130522\sdk\tools (this is assuming you are using the Android tools installed by RAD Studio. Adjust your paths as necessary). Relaunch the emulator and the error should go away, and your emulator should be much faster. There is another method that involves updating path information, but just copying the necessary files is easier.
Run your Emulator on a Mac – I’ve heard reports that the OpenGLES libraries are faster on Mac OS X than on Windows, because Windows prefers DirectX, while OS X prefers OpenGL. You can use the remote emulator setup to make that work (assuming you have a Mac handy). Likewise, if you have a computer with a newer and more powerful GPU and CPU, then use that one. Be sure you combine this tip with the previous two (to Use Host GPU).
Run an Older Version of Android – Sure, Kit Kat is new and Shiney, but not everyone has it yet. The newer versions of Android are typically more demanding on the hardware, so newer may be slower. Check out the Android Platform Version Dashboard and go back to an older, popular version, or just stick with Gingerbread and know you will support close to 98% of all Android devices.
Tweak the AVD Hardware Configuration – One advantage of the using the Android Emulator is you can test specific hardware configurations, so this one is less useful. But if you increase the memory (within reason) and make the screen smaller (again within reason) that can give you a minor performance increase too.
Generally speaking, I would suggest everyone use tips 2, 4, 5 and maybe 7, but everyone’s situation and needs are different, so pick and test the tips that give you the best Android Emulator AVD performance possible. Good luck, and happy Android development and debugging!
The Delphi Wiki has a much more exhaustive Supported Android Devices list. It also includes the new Nexus 5 (running Kit Kat), Google Glass and Droid Razr M, to name a few. At the bottom of the list there are some BlackBerry devices listed too, all of which are either not tested, or not supported. Curious to see if any of those end up working
There is also a link to some easy to follow testing instructions if you want to test your own devices, including some scripts to help automate part of the process.
Looking at the list it is obvious that there are more supported devices than not. Most pass over 80% of the tests too, of course it is always nice to see specific devices verified.
Delphi automatically installs and runs your app for you, but sometimes it is nice to do manually from the command-line. Here are the commands you need. These all assume adb (Android Debug Bridge) is on your system path and you only have one Android device (or emulator) attached. They should work on both Mac and Windows.
See the end for notes on multiple devices or if you are running both an emulator and device.
First to install your app:
adb install path\ProjectName.apk
In this example path\ProjectName.apk is the full relative path to the apk. The apk usually has the same name as the project. If your apk is already installed, then use the following command to “reinstall” it, leaving the data intact:
adb install -r path\ProjectName.apk
The great thing about the -r is it works even if it wasn’t already installed.
Now if you want to uninstall your apk you can do that too:
Again, com.embarcadero.ProjectName is the default name of the package. If you changed it under Project Options -> Version Info -> Package, then use that value instead. BTW, the pm in there is the Android Package Manager.
One note, when Delphi deploys your app to run it, it performs an uninstall first. This results in all the data being cleaned out, which can be useful during development to be sure you don’t leave anything behind from the previous run. When a user updates an app from the App store, or installs it via most any other means, then it performs a reinstall, which leaves the data intact.
adb shell am start -n com.embarcadero.ProjectName/com.embarcadero.firemonkey.FMXNativeActivity
There are two parts to this. Before the slash is the package name, just like for uninstalling it. After the slash is the name of the Main Activity, which unless you’ve edited your AndroidManifest.template.xml (and some other fundamentals of your app) is always com.embarcadero.firemonkey.FMXNativeActivity. If you are trying to start an app written with another tool, then consult the AndroidManifest, but it is common for most tools to use MainActivity, so you can launch it like:
adb shell am start -n com.other.ProjectName/.MainActivity
If you want to stop your app after it is running, you just need the name of the package and the following:
adb shell am force-stop com.embarcadero.ProjectName
This can be useful to test what your app behaves like from a fresh restart, vs. just returning from the background.
The Android adb tool is very powerful. Most of these are using the shell command which actually allow you to pass commands to the modified Linux shell that runs inside Android. You can actually use “adb shell” to open a shell prompt and navigate your device like a remote machine.
If you have both an emulator running and a device attached then you can use the switch -d like
adb -d shell
and it directs it to the only device. If you use -e then it goes to the emulator.
When you have multiple devices then use -s and the device ID which can be obtained via the adb devices command.


 Next go to the folder where your Android SDK is installed. With RAD Studio XE5 the default install location is under Users\Public\Documents:
 This is your Android device without a driver loaded. If you don’t see it then either it isn’t connected, or your Android device isn’t in developer mode. It is possible it may show up with the name of the Android device, but it should still be under “Other devices” and have the yellow triangle on it. Right click on this device and select properties.
  Then go to the Details tab and from the dropdown select the Hardware Ids property.

 This has two common causes, the first is fixed with a reboot. If that doesn’t work then you need to copy the necessary DLLs to a different directory so the emulator can find them. Simply copy lib*.* from C:\Users\Public\Documents\RAD Studio\12.0\PlatformSDKs\adt-bundle-windows-x86-20130522\sdk\tools\lib up one folder to C:\Users\Public\Documents\RAD Studio\12.0\PlatformSDKs\adt-bundle-windows-x86-20130522\sdk\tools (this is assuming you are using the Android tools installed by RAD Studio. Adjust your paths as necessary). Relaunch the emulator and the error should go away, and your emulator should be much faster. There is another method that involves updating path information, but just copying the necessary files is easier.